A color scheme can be very valuable when properly implemented. I am in the process of printing parts for a “Mostly Printed Parts CNC mill”.
The different axis’s in FreeCAD, OpenSCAD, Slicr3r, and Cura X are consistent with X axis is Green, Y axis is Red, and Z axis is Blue. It makes sense to print the moving pieces in the color of their axis!
Color Scheme for MPP-CNC
Referring to the ‘Green’ axis instead of the ‘X’ axis will help someone who is not familiar with the equipment. It may also assist prevent an experienced operator from making a mistake because there is an obvious clue as to which axis is which.
There is one final moving part in this color scheme, the combination of X and Y. This is the Head’s position on the X and Y coordinate, which could be considered the ‘Dot’ so I selected Black.
The rest of the parts are not moving parts and as such can be any color. However, I decided that Green and Red would work for Left and Right, with Green for the left mounts. Unfortunately I started printing with the idea of printing the M (Mirror) copies in a different colors which puts Green and Red on opposite corners from each other which makes no sense. When I realized this I started thinking about an overall color scheme.
I started with the tool holder. Blue would have been confusing because the Z axis pieces are mounted perpendicular to the blue pieces. I decided Yellow was a good color. It makes the working end of the unit obvious and yellow indicates ‘caution’ which makes sense.
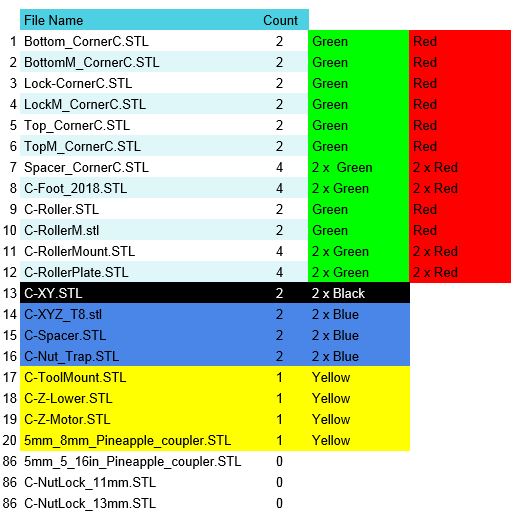
In order to make it easy to identify which parts I renamed the files adding an order in front of the name. This chart is a summary of the colors I used.
Summary
I’ve identified the start of a color scheme for the X Y and Z axis as well as the XY location. I’ve also coded the left and right sides, as well as the tool. I believe this is a minor enhancement to what I’ve read is a great design.
Look forward to future posts on the building and operation of this unit and a picture of the finished unit in full color.